

Post by Achilles on Feb 22, 2011 23:39:34 GMT -6
So Thatpirateguy and I played a pair of games tonight. Both were straight firefights as we are still getting comfortable with the rules.
GAME 1
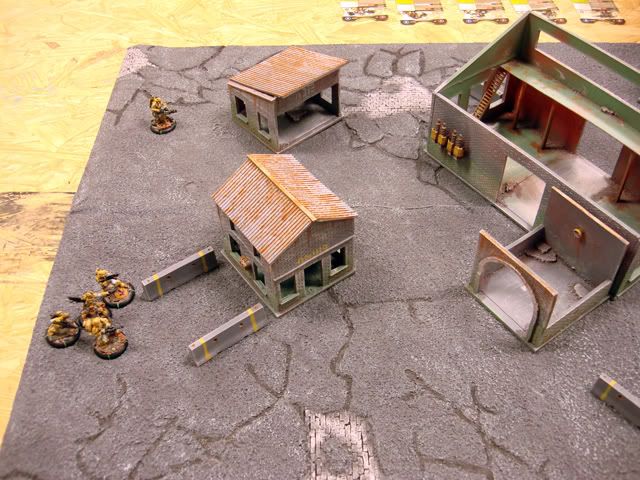
The Yellowjackets deployed in a group, hoping to hunker down and force some suppressive fire and overwatch on the advance of the more slippery Kemvar squad.

The Kemvar deployed in a loose line out of Line of Site of the CCC troops.

While the CCC advance into a storage shed, setting up Suppressive fire, the Heavy snaps to a barricade and sets to prepare to fire. The entire Kemvar team Bounds on their lowest initiative model to get into position; quickly infiltrating the factory.

The sniper takes up positiion to cover the doorway and flank, while the incinerator moves into position at the oposite shed to launch the inevitable counter attack.

The Kemvar assault is decisive and thorough. The Assasin neutralises the Incinerator with a charge, putting two blood on her. The medic hustles over to attempt a rescue but one of his shots go wild. He succeeds in allowing the Incinerator to snap to him so that she can flame the offending Kemvar infiltrator and put him down.
As the CCC attempts to retaliate the Kemvar Heavy, Sniper and Leader tear apart the rest of the team. Only the assault leader remains in the shed.

Alone and surrounded, the CCC Assault Leader makes a last stand in the rain-shelter. Taking fire from all sides he is neutralized by the monkeywrench in a storm of fire. Victory to Kemvar!
We learned quite a bit in this game. The CCC Heavy was utterly useless at shooting the Kemvar camo troops. I was much more impressed with Suppression as it was how i managed to weather the initial jump from the building. Losing my Incinerator so early on also removed my best chance at neutralizing the Camo itself. We forgot that suppression causes +1 TN to enemy shooting even if they pass the courage test. We also misinterpreted Melee range as base to base instead of within 1 base. Resovled to learn from our mistakes we entered game 2!
GAME 2
Deployment and basic Firefight scenario were the same. We moved around the buildings a bit and ended up swapping sides to change things up a tad.

Having learned from the previous game that the Incinerator needs a Bound target to get into position I decided to pair up the Sniper with the Incinerator. Kat would keep the sniper safe while reloading and the Sniper would hopefully give me someone to bound off of during that time.
The Medic, Heavy and Assault Leader were determined to pin down the Kemvar this time long enough to get Kat in position, so they grouped together with an eye to an inviting fire lane.

Once again the Kemvar spread out to take advantage of their speed and ability to react to my deployment.

The two fireteams of the CCC advance into position with creative use of bounding and S2C. The sniper and incinerator work around the flank and position themselves out of line of site.
In response the Kemvar again infiltrate the factory building. The Kemvar sniper hunkers down to do his best to get line of site to the Medic and Heavy.
This is where it all breaks down. The Assault Leader, Heavy and Medic enter into suppressive fire. All three gain site to the Kemvar in the factory building, two to the Heavy and Kemvar sniper.
Suppression pins the Kemvar team for three turns of lossed activations. S2C eventually frees up the Kemvar heavy to fire due to his Heroic ability, but the combination of suppression and cover keeps it from being effective.

With the Kemvar held pinned by the suppression, the Incinerator works her way over to the Factory building while the sniper does his same through the windows. Three turn of flamer fire later and the Kemvar unit is shattered, flaming and reduced to a single blood heavy and the suppressed sniper at which point the squad conceded.
Fun games, very much action packed. Both of us picked up some more nuances of the game (especially suppression/flanking instead of beating my head against the wall trying to get hits in on the sneaky Kemvar!).
More to come!
GAME 1
The Yellowjackets deployed in a group, hoping to hunker down and force some suppressive fire and overwatch on the advance of the more slippery Kemvar squad.
The Kemvar deployed in a loose line out of Line of Site of the CCC troops.
While the CCC advance into a storage shed, setting up Suppressive fire, the Heavy snaps to a barricade and sets to prepare to fire. The entire Kemvar team Bounds on their lowest initiative model to get into position; quickly infiltrating the factory.
The sniper takes up positiion to cover the doorway and flank, while the incinerator moves into position at the oposite shed to launch the inevitable counter attack.
The Kemvar assault is decisive and thorough. The Assasin neutralises the Incinerator with a charge, putting two blood on her. The medic hustles over to attempt a rescue but one of his shots go wild. He succeeds in allowing the Incinerator to snap to him so that she can flame the offending Kemvar infiltrator and put him down.
As the CCC attempts to retaliate the Kemvar Heavy, Sniper and Leader tear apart the rest of the team. Only the assault leader remains in the shed.
Alone and surrounded, the CCC Assault Leader makes a last stand in the rain-shelter. Taking fire from all sides he is neutralized by the monkeywrench in a storm of fire. Victory to Kemvar!
We learned quite a bit in this game. The CCC Heavy was utterly useless at shooting the Kemvar camo troops. I was much more impressed with Suppression as it was how i managed to weather the initial jump from the building. Losing my Incinerator so early on also removed my best chance at neutralizing the Camo itself. We forgot that suppression causes +1 TN to enemy shooting even if they pass the courage test. We also misinterpreted Melee range as base to base instead of within 1 base. Resovled to learn from our mistakes we entered game 2!
GAME 2
Deployment and basic Firefight scenario were the same. We moved around the buildings a bit and ended up swapping sides to change things up a tad.
Having learned from the previous game that the Incinerator needs a Bound target to get into position I decided to pair up the Sniper with the Incinerator. Kat would keep the sniper safe while reloading and the Sniper would hopefully give me someone to bound off of during that time.
The Medic, Heavy and Assault Leader were determined to pin down the Kemvar this time long enough to get Kat in position, so they grouped together with an eye to an inviting fire lane.
Once again the Kemvar spread out to take advantage of their speed and ability to react to my deployment.
The two fireteams of the CCC advance into position with creative use of bounding and S2C. The sniper and incinerator work around the flank and position themselves out of line of site.
In response the Kemvar again infiltrate the factory building. The Kemvar sniper hunkers down to do his best to get line of site to the Medic and Heavy.
This is where it all breaks down. The Assault Leader, Heavy and Medic enter into suppressive fire. All three gain site to the Kemvar in the factory building, two to the Heavy and Kemvar sniper.
Suppression pins the Kemvar team for three turns of lossed activations. S2C eventually frees up the Kemvar heavy to fire due to his Heroic ability, but the combination of suppression and cover keeps it from being effective.
With the Kemvar held pinned by the suppression, the Incinerator works her way over to the Factory building while the sniper does his same through the windows. Three turn of flamer fire later and the Kemvar unit is shattered, flaming and reduced to a single blood heavy and the suppressed sniper at which point the squad conceded.
Fun games, very much action packed. Both of us picked up some more nuances of the game (especially suppression/flanking instead of beating my head against the wall trying to get hits in on the sneaky Kemvar!).
More to come!